the RoboCLuedo URDF model – User Manual
Model file structure
inside the folder robocluedo_urdf_model there are these files:
generate_model.shis a script to tect the correctness of the model; it also generates a.pdfschematic of the modelrobocluedo_xacro.xacrois (as the name suggests) the XACRO model of a robot labeled robocluedo_robot. the model is split into three files:robocluedo_gazebo_materials: graphical appearance of the robotrobocluedo_chassis: the moving platform of the robotrobocluedo_arm: the robotics armrobocluedo_arm_gripper: the gripper of the robotic arm; it includes the link labeled cluedo_linkrobocluedo_gazebo_sensing: definition of the Gazebo pluging related to the sensing; vision, laser, everything inside this filerobocluedo_sensing: this file contains the sensors mounted on the robotrobocluedo_gazebo_plugins: definition of the Gazebo plugins, without the sensing partrobocluedo_transmission: Gazebo controllers
HOW TO generate the model
execute the file generate_model.sh; the URDF and its schematic will be located into the folder model with names
robocluedo_urdf.urdffor the URDF model,and
robocluedo_urdf.pdffor the schematic
the output should be like the following:
robot name is: robocluedo_robot
---------- Successfully Parsed XML ---------------
root Link: base_link has 4 child(ren)
    child(1):  arm_base_link
        child(1):  arm_link_01
            child(1):  arm_link_02
                child(1):  arm_link_03
                    child(1):  cluedo_link
                        child(1):  left_grip_link
                        child(2):  right_grip_link
    child(2):  laser
    child(3):  link_left_wheel
    child(4):  link_right_wheel
Created file robocluedo_robot.gv
Created file robocluedo_robot.pdf
HOW TO generate the package with Moveit
first of all, use the setup assistant to generate the package. Inside the project, robocluedo_robot.
roslaunch moveit_setup_assistant setup.assistant.launch
the code generated by the setup assistant won’t work at the beginning. Here are the fixes:
In trajectory_execution.launch.xml, we need to comment line 21
In config/ros_controllers.yaml, let’s modify the gain of the proportional controllers
In config/joint_limits.yaml let’s set to 1 the scaling factor.
file ros_controllers.yaml
# Simulation settings for using moveit_sim_controllers
moveit_sim_hw_interface:
  joint_model_group: arm_group
  joint_model_group_pose: extended
# Settings for ros_control_boilerplate control loop
generic_hw_control_loop:
  loop_hz: 300
  cycle_time_error_threshold: 0.01
# Settings for ros_control hardware interface
hardware_interface:
  joints:
    - arm_joint_01
    - arm_joint_02
    - arm_joint_03
    - arm_joint_04
    - joint_a_left_wheel
    - joint_a_right_wheel
    - joint_left_wheel
    - joint_right_wheel
  sim_control_mode: 1  # 0: position, 1: velocity
# Publish all joint states
# Creates the /joint_states topic necessary in ROS
joint_state_controller:
  type: joint_state_controller/JointStateController
  publish_rate: 50
controller_list:
  - name: arm_group_controller
    action_ns: follow_joint_trajectory
    default: True
    type: FollowJointTrajectory
    joints:
      - arm_joint_01
      - arm_joint_02
      - arm_joint_03
      - arm_joint_04
  - name: end_effector_group_controller
    action_ns: follow_joint_trajectory
    default: True
    type: FollowJointTrajectory
    joints:
      arm_joint_04
arm_group_controller:
  type: effort_controllers/JointTrajectoryController
  joints:
    - arm_joint_01
    - arm_joint_02
    - arm_joint_03
    - arm_joint_04
  gains:
    arm_joint_01:
      p: 10
      d: 0
      i: 0
      i_clamp: 0
    arm_joint_02:
      p: 10
      d: 0
      i: 0
      i_clamp: 0
    arm_joint_03:
      p: 10
      d: 0
      i: 0
      i_clamp: 0
    arm_joint_04:
      p: 10
      d: 0
      i: 0
      i_clamp: 0
file joint_limits.yaml
# joint_limits.yaml allows the dynamics properties specified in the URDF to be overwritten or augmented as needed

# For beginners, we downscale velocity and acceleration limits.
# You can always specify higher scaling factors (<= 1.0) in your motion requests.  # Increase the values below to 1.0 to always move at maximum speed.
default_velocity_scaling_factor: 1.0
default_acceleration_scaling_factor: 1.0

# Specific joint properties can be changed with the keys [max_position, min_position, max_velocity, max_acceleration]
# Joint limits can be turned off with [has_velocity_limits, has_acceleration_limits]
joint_limits:
  arm_joint_01:
    has_velocity_limits: true
    max_velocity: 0.2
    has_acceleration_limits: false
    max_acceleration: 0
  arm_joint_02:
    has_velocity_limits: true
    max_velocity: 0.2
    has_acceleration_limits: false
    max_acceleration: 0
  arm_joint_03:
    has_velocity_limits: true
    max_velocity: 0.2
    has_acceleration_limits: false
    max_acceleration: 0
  arm_joint_04:
    has_velocity_limits: true
    max_velocity: 0.5
    has_acceleration_limits: false
    max_acceleration: 0
Gazebo world files fix
apply this code into the file gazebo.launch :
<?xml version="1.0"?>
<launch>
  <arg name="paused" default="false"/>
  <arg name="gazebo_gui" default="true"/>
  <arg name="urdf_path" default="$(find robocluedo_urdf_model)/robot/model/robocluedo_urdf.urdf"/>

  <!-- world file -->
  <arg name="world_path" default="$(find worlds)"/>
  <arg name="world_name" default="square_room.world"/>
  <arg name="world_file_path" default="$(arg world_path)/$(arg world_name)" />

  <!-- startup simulated world -->
  <include file="$(find gazebo_ros)/launch/empty_world.launch">
    <arg name="paused" value="$(arg paused)"/>
    <arg name="gui" value="$(arg gazebo_gui)"/>
    <arg name="world_name" value="$(arg world_file_path)" />
  </include>

  <!-- send robot urdf to param server -->
  <param name="robot_description" textfile="$(arg urdf_path)" />

  <!-- push robot_description to factory and spawn robot in gazebo at the origin, change x,y,z arguments to spawn in a different position -->
  <node name="spawn_gazebo_model" pkg="gazebo_ros" type="spawn_model" args="-urdf -param robot_description -model robot -x 0 -y 0 -z 0"
    respawn="false" output="screen" />

  <include file="$(find robocluedo_robot)/launch/ros_controllers.launch"/>

</launch>
and apply this fix in the demo_gazebo.launch :
<arg name="world_path" default="$(find worlds)"/>
<arg name="world_name" default="square_room.world"/>
<arg name="world_file_path" default="$(arg world_path)/$(arg world_name)" />

<!-- launch the gazebo simulator and spawn the robot -->
<include file="$(find robocluedo_robot)/launch/gazebo.launch" >
  <arg name="paused" value="$(arg paused)"/>
  <arg name="gazebo_gui" value="$(arg gazebo_gui)"/>
  <arg name="urdf_path" value="$(arg urdf_path)"/>
  <arg name="world_name" value="$(arg world_name)" />
  <arg name="world_path" value="$(arg world_path)" />
  <arg name="world_file_path" value="$(arg world_file_path)" />
</include>
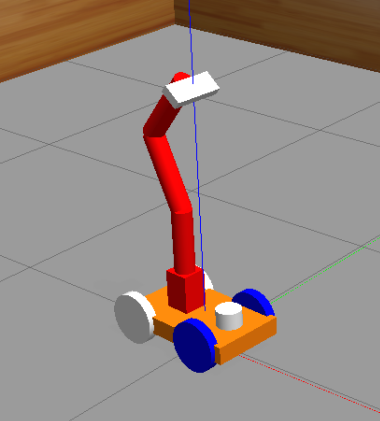
HOW TO test the model with Gazebo
launch this:
roslaunch robocluedo_robot gazebo.launch
it should appear the robot, similar to this:
HOW TO Launch the simulation with other worlds file
the package takes the world files from the package worlds located into the robocluedo_depedencied folder. The default world file is square_room.world.
here’s the syntax of the command:
roslaunch robocluedo_robot gazebo.launch world_name:=indoor.world
HOW TO launch a world outside the package worlds
in case the world file is not included in the worlds package, you have two possibilities.
the first one is to specify both path and name in this way:
roslaunch robocluedo_robot demo_gazebo.launch world_name:=indoor.world world_file:=/root/ros_ws/src/erl2-new/robocluedo_dependencies/worlds
the second one is to directly specify the path with the variable world_file_path:
roslaunch robocluedo_robot demo_gazebo.launch world_file_path:=/root/ros_ws/src/erl2-new/robocluedo_dependencies/worlds/indoor.world